 | |||
| Plague Doctors' Debate |

Sunday, June 3, 2012
Plague Doctors Animated
I've created my first animated GIF featuring those always bickering plague doctors.
Friday, April 20, 2012
Views of My Studio
I've had a lot of "stuff" in my studio lately which is visually interesting, so I thought I'd share some photographs of where I work. The following pics are unposed and unedited. I shot these first thing upon arriving at work in the morning.


A batch of classical plague doctors mask, stained and ready for assembly.

An assortment of steampunk masks and helmets.
Storage of blank filigree masks, ready to paint and finish.

The head forms that we use to shape our masks.

Finished steampunk masks stored on my office shelves.
Saturday, March 10, 2012
Making a Plague Doctor's Hat
I decided to make a plague doctor's hat in order to photograph my classic plague doctor mask with all of the correct attire and accessories.
 This contemporary engraving from 1656 served as my inspiration.

This is what I came up with, using black deerskin leather for the hat. A cotton balaclava hides the back of the head and neck. The hat is made of three pieces: The brim, the crown, and the top. While not a really simple project, one could make this hat with ordinary tools.

 I began by figuring out the patterns through trial and error. I made the head opening fairly large so that it could fit over the mask straps and balaclava. The top is an oval measuring 7½" wide by 9¼" tall.
 The crown is a simple rectangle, measuring 4½" by 25". The deerskin is soft and of medium weight, and cut easily with shears.

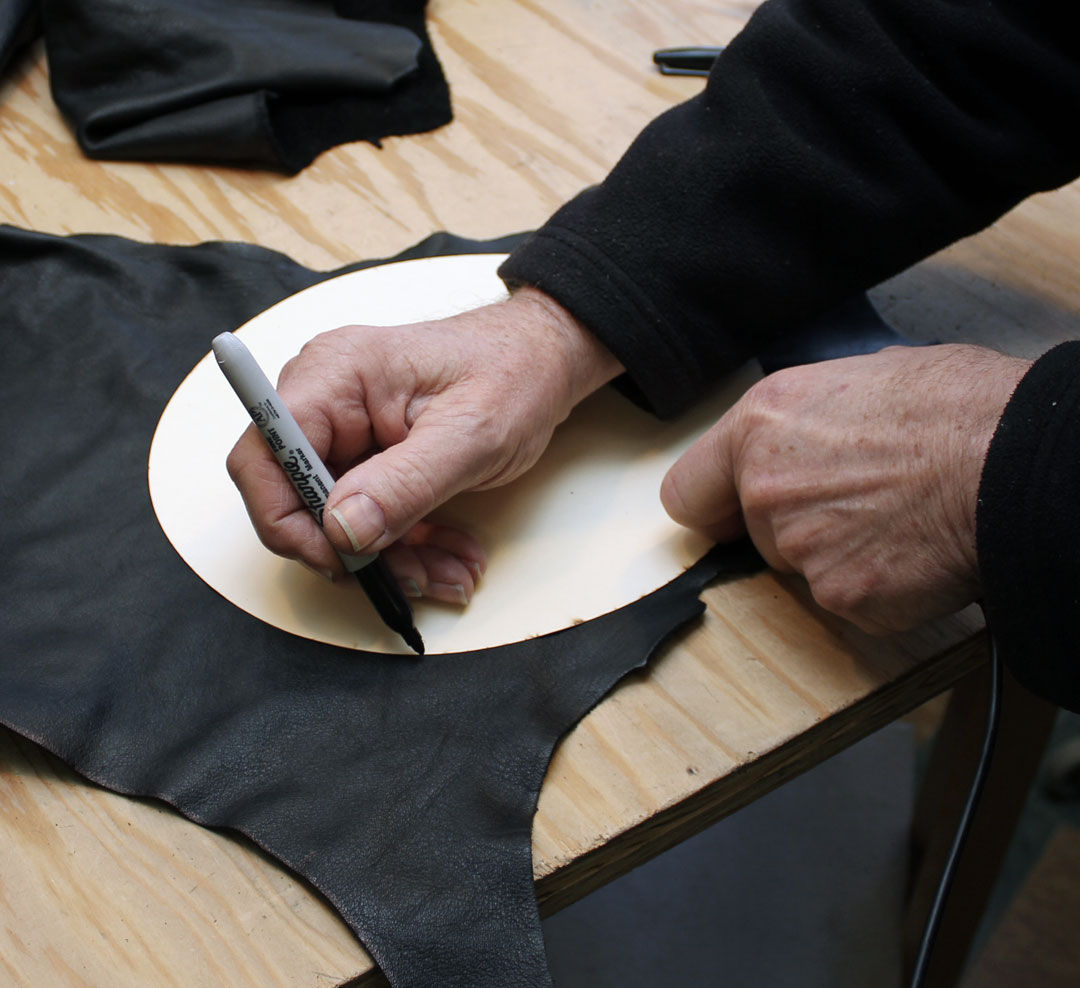
 The brim is an oval inside of another oval. The outer oval measures 16¼" long by 15" wide, and the inner opening is 6¼" by 8". The inner oval sits right in the middle of the pattern.
 After cutting the outer shape I folded the leather to start the inner cut.

 After the three parts were cut out I folded the crown over onto itself and applied contact cement along the outside of one end and the inside of the other, about ¼" wide.
 After about ten minutes I carefully pressed the two ends together, overlapping them, and tapped the seam with a hammer to make the cement bond even stronger.
 Then I folded the crown in half and marked the front by cutting a small notch. I folded it again with the front aligned with the back seam, and clipped the two center sides. These marks were used to line up the top.

I clipped the top the same way, then lined up the marks and stapled them together, right sides together, which in this case is the topgrain side of the leather. After stapling the four marks I stapled half way in between them, then half way in between them again, until I had the two parts held firmly together. You will need to compress the top, as it should feel a little big for the crown.

I then sewed them together making sure that the needle stayed inside of the staple line. I used an industrial flatbed sewing machine, but you could sew this easily with a household sewing machine as long as you used diamond shaped needles designed for leather.
Fabric needles are designed to slide in between threads without cutting them. Leather is a solid material with no holes, so you need a needle that is very sharp and cuts a hole as it sews.
 After machine stitching the top and crown together, I removed the staples with a small knife.
 In order to make the top half of the hat hold its shape and not be floppy I decided to reinforce the top. First I cut out a piece of chipboard the same size and shape as the leather top. You can use chipboard from a legal pad for this, after removing all the paper.
 I applied contact cement to one side of the chipboard and the inside of the top. I didn't let it dry at all this time before placing the hat on top of the chipboard top.
 Once aligned I pressed it together working from the center out, being sure I didn't get any wrinkles in it.
 The I turned the hat right side out.
 Next I placed the crown over an upside-down 5 quart plastic bucket. Then I applied contact cement to the bottom outside edge of the crown and around the brim opening on the wrong (flesh) side. I let it dry for ten minutes, then carefully slid the brim down over the crown. The bucket supports the crown from inside so that you can stretch the brim evenly.
 At this point the hat is ready to sew on the flatbed machine. I sewed it from the inside, and the outside facing down.
 The soft leather brim is very floppy, so you need to reinforce it with wire. I used a 14 gauge steel wire from my local hardware store. I bent it around twice, and taped the two wire together, but I recommend you just make one loop with a 1 - 2" overlap.

 You can see in the photo above that the wire sits inside the outer edge of the brim by about ½". I turned the edge of the brim over the wire and sewed it down, again on my flatbed industrial machine.
An easier way to do this would be to use bias tape to cover the edge and hold the wire in place.
 Here is the finished hat. Both the chipboard top support and the wire in the brim are important to give the hat its shape. The size of the hat is XL, which fits over the balaclava and the mask, but because the crown is short, the hat rests on the top of your head. This makes the size of the head opening not so important, and better too large than too small.
 This contemporary engraving from 1656 served as my inspiration.
This is what I came up with, using black deerskin leather for the hat. A cotton balaclava hides the back of the head and neck. The hat is made of three pieces: The brim, the crown, and the top. While not a really simple project, one could make this hat with ordinary tools.

 I began by figuring out the patterns through trial and error. I made the head opening fairly large so that it could fit over the mask straps and balaclava. The top is an oval measuring 7½" wide by 9¼" tall.
 The crown is a simple rectangle, measuring 4½" by 25". The deerskin is soft and of medium weight, and cut easily with shears.
 The brim is an oval inside of another oval. The outer oval measures 16¼" long by 15" wide, and the inner opening is 6¼" by 8". The inner oval sits right in the middle of the pattern.
 After cutting the outer shape I folded the leather to start the inner cut.
 After the three parts were cut out I folded the crown over onto itself and applied contact cement along the outside of one end and the inside of the other, about ¼" wide.
 After about ten minutes I carefully pressed the two ends together, overlapping them, and tapped the seam with a hammer to make the cement bond even stronger.
 Then I folded the crown in half and marked the front by cutting a small notch. I folded it again with the front aligned with the back seam, and clipped the two center sides. These marks were used to line up the top.
I clipped the top the same way, then lined up the marks and stapled them together, right sides together, which in this case is the topgrain side of the leather. After stapling the four marks I stapled half way in between them, then half way in between them again, until I had the two parts held firmly together. You will need to compress the top, as it should feel a little big for the crown.

I then sewed them together making sure that the needle stayed inside of the staple line. I used an industrial flatbed sewing machine, but you could sew this easily with a household sewing machine as long as you used diamond shaped needles designed for leather.
Fabric needles are designed to slide in between threads without cutting them. Leather is a solid material with no holes, so you need a needle that is very sharp and cuts a hole as it sews.
 After machine stitching the top and crown together, I removed the staples with a small knife.
 In order to make the top half of the hat hold its shape and not be floppy I decided to reinforce the top. First I cut out a piece of chipboard the same size and shape as the leather top. You can use chipboard from a legal pad for this, after removing all the paper.
 I applied contact cement to one side of the chipboard and the inside of the top. I didn't let it dry at all this time before placing the hat on top of the chipboard top.
 Once aligned I pressed it together working from the center out, being sure I didn't get any wrinkles in it.
 The I turned the hat right side out.
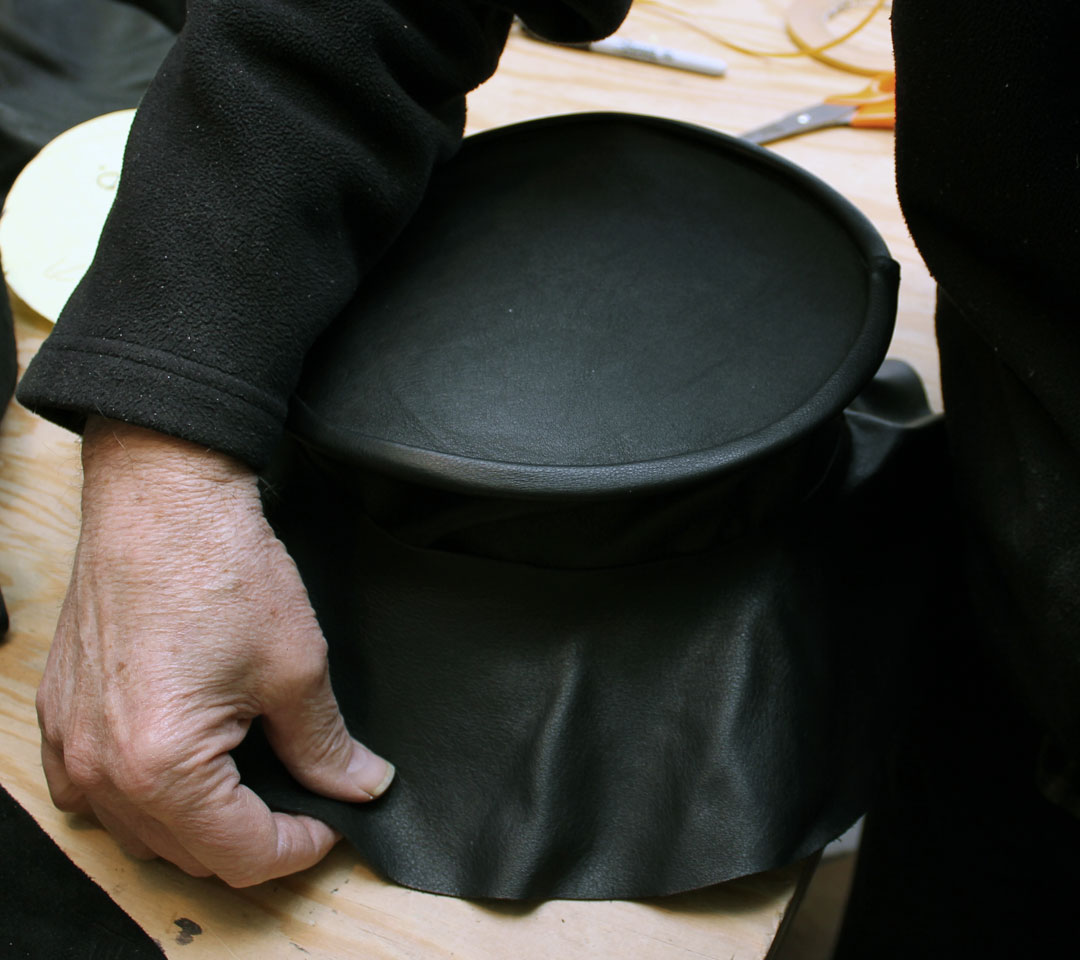 Next I placed the crown over an upside-down 5 quart plastic bucket. Then I applied contact cement to the bottom outside edge of the crown and around the brim opening on the wrong (flesh) side. I let it dry for ten minutes, then carefully slid the brim down over the crown. The bucket supports the crown from inside so that you can stretch the brim evenly.
 At this point the hat is ready to sew on the flatbed machine. I sewed it from the inside, and the outside facing down.
 The soft leather brim is very floppy, so you need to reinforce it with wire. I used a 14 gauge steel wire from my local hardware store. I bent it around twice, and taped the two wire together, but I recommend you just make one loop with a 1 - 2" overlap.
 You can see in the photo above that the wire sits inside the outer edge of the brim by about ½". I turned the edge of the brim over the wire and sewed it down, again on my flatbed industrial machine.
An easier way to do this would be to use bias tape to cover the edge and hold the wire in place.
 Here is the finished hat. Both the chipboard top support and the wire in the brim are important to give the hat its shape. The size of the hat is XL, which fits over the balaclava and the mask, but because the crown is short, the hat rests on the top of your head. This makes the size of the head opening not so important, and better too large than too small.
Sunday, March 4, 2012
Plague Doctor Mask Illustrations
Here are a couple of more illustrations I've created in Photoshop using my plague doctor masks.
 Above is the Ichabod mask, set in an Elizabethan scene. It is titled "The Displeased Patron" and shows the obsequious artist attempting to convince the nobleman that the painting is worthy. I made all the costumes (for both illustrations) years ago when I was in the Society for Creative Anachronism.
 Here the Krankheit mask is shown in a medieval setting. The wealthy nobleman is remembering his days during the crusades in the middle east, and the mysterious woman who sold him his plague doctor mask.
All masks shown are available for sale on my etsy store.
Wednesday, February 8, 2012
Olifant Outlaw
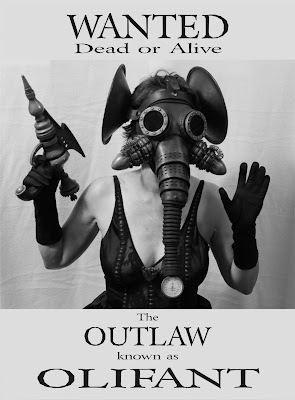
As part of my learning with Photoshop I decided to create a remake of a picture I took of my wife Jill several years ago wearing the Pachydermos mask, as seen below.
 I figured with my new camera and lighting equipment that I could improve on the original, which was not well lit and a bit out of focus.
 First I posed her on a white background for easy extraction in a pose similar to the first one, and with most of the same costume.
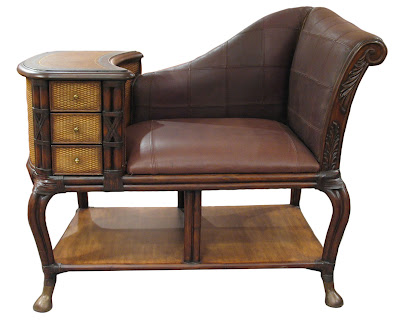 I then went to stock.xchng to look for free pictures that they offer for the furniture and interior. Here is a great old telephone table that looks like it could be Victorian, which is the look I was after.
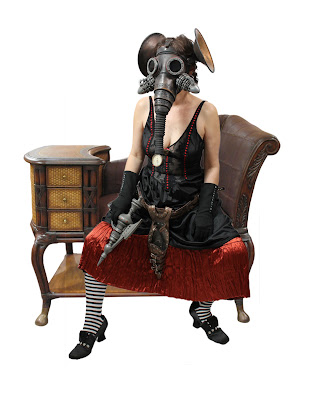 After extracting the figure in Photoshop (removing the background) I combined her with the seat, resizing them as necessary to make it look like they went together.
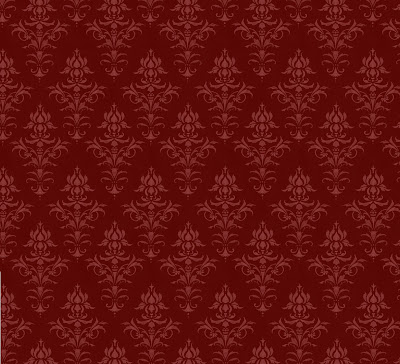 Next I looked for wallpaper and discovered this pattern on DeviantArt, which was offered for free usage.
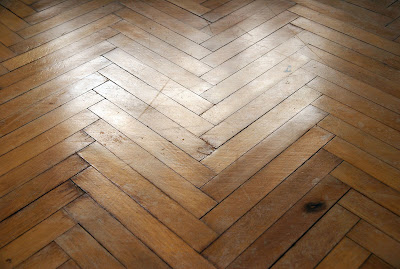 And back on stock.xchng I found a nice old floor.
 I decided that a wanted poster for our heroine would be a nice touch, and created this one in Corel Draw. I then combined all the images, and photographed and added in some miscellany to populate the floor for my final image, seen below.
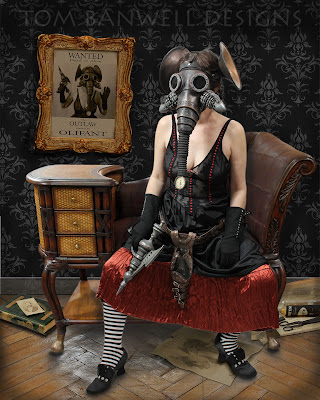 My original plan was to extract the figure and find a single photo to place her in. I ended up with ten separate images which make up the final picture.
Saturday, February 4, 2012
Krankheit Photo
A new photograph of the black leather Krankheit, my riveted plague doctor mask. Edited in PhotoShop, my new source of delight.
 Click on the image to see the detail.
 Click on the image to see the detail.
Tuesday, January 24, 2012
Strange Artifact from Tokyo
Bassist/composer Yuki Tsuda of the Japanese band and steampunk unit Strange Artifact recently performed in Tokyo wearing my Ragnarök gas mask. From the report I received the mask was a big hit!

You can read about the band and see more pics on their Facebook page.

You too can own one of these fabulous steampunk gas masks, which I'm selling on Etsy.

You can read about the band and see more pics on their Facebook page.

You too can own one of these fabulous steampunk gas masks, which I'm selling on Etsy.
Friday, January 20, 2012
Eviction
Another commissioned leather and resin mask. I decided a couple of months ago that I really should learn to take good photographs of my work, and to that end I bought a Canon eos T2i, some good lighting equipment and Adobe Photoshop. I have been studying all three since then, and here, ladies and gentlemen, is my first Photoshopped image of my steampunk leatherwork.

I've titled it Eviction, and I'm quite pleased with how it turned out. Models are my wife and myself. Background is the entry to Empire Mine State Park in Grass Valley, California. The two models and the background were all photographed separately and assembled in Photoshop. What a great program!
I've titled it Eviction, and I'm quite pleased with how it turned out. Models are my wife and myself. Background is the entry to Empire Mine State Park in Grass Valley, California. The two models and the background were all photographed separately and assembled in Photoshop. What a great program!
Tuesday, December 13, 2011


Monday, December 12, 2011


Subscribe to:
Posts (Atom)