When making a silicone rubber mold (
into which is cast resin) there is typically a supportive outer shell, called a
mother mold. Often the mother mold serves another purpose as well, that of containing the liquid rubber while it cures into a solid.
 A very simple and easy-to-use container for making many types of molds is a paper cup. I have a supply of picnic and popcorn cups in various sizes for just this purpose. For most castings, the paper cup will work also as the mother mold, keeping the mold parts tightly together while the liquid resin cures. For the Rhino canister mold however, I need a rigid mother mold, and here's why.
Due to the fact that I need the cast part to be as lightweight as possible (so that the gas mask will be comfortable to wear), I am going to make it hollow, and the most efficient way to do this is in a rotocasting machine (which holds the mold and rotates it in two different axis at the same time).
 I need to clamp the mother mold (and silicone daughter mold) into the rotocaster, and to withstand that pressure I need a rigid mother mold, as the paper cup will just squash. These pictures document the procedure for making this.
The top picture shows the blue silicone rubber mold after it has been removed from the popcorn cup. Below that I am pulling on a 3" diameter nylon stockinette.
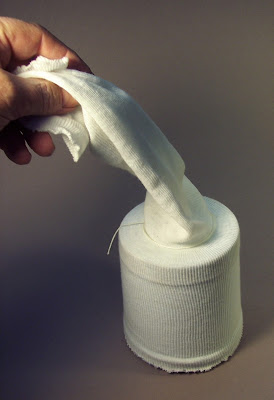 I cut the stockinette long enough so that I could double it over. Here I have loosely tied a string around the top.
 Now I have pulled the top half of the stockinette back over the bottom half, so that I have a two layers.
 Here I've mixed up polyester resin with an activator (and violet dye), and brushed it all over the stockinette until it's saturated.
 And here is the final result after it has cured, with the rigid mother mold on the right.

 Since 73% of respondents to my poll on horn direction favored up, I have gone with that.


 This first mask turned out smaller than I had expected. Definitely a size small. I have listed it on Ebay with a $1 starting bid. There are more photos there. Rhino on Ebay


 The final step is polishing the piece with a Dynabrade rotary buffer, using a foam pad and compounding liquid. That final polishing is the key to getting it to shine.


