

Tuesday, November 16, 2010
Raven Mask as Fine Art
Kathrin Longhurst of Seaforth, New South Wales, Australia was kind enough to share a painting she did of my raven mask. Cool, eh?


Thursday, October 28, 2010
Respirator #4 with Canisters
Last month I started on respirator #4, then had to set it aside while I filled all the Halloween mask orders coming in.

I have at last had time to get back to it. I redesigned the ventilation holes, and constucted the canister, making it smaller than my previous respirator. Pictured above is the undyed leather mask and canister prototype.

Here is the respirator assembled (except for the straps) and dyed and antiqued. I'm hoping to be able to retail this piece for under $100.

I have at last had time to get back to it. I redesigned the ventilation holes, and constucted the canister, making it smaller than my previous respirator. Pictured above is the undyed leather mask and canister prototype.

Here is the respirator assembled (except for the straps) and dyed and antiqued. I'm hoping to be able to retail this piece for under $100.
Wednesday, October 13, 2010
Lois Lane: Dominatrix
More TV news. On the CW's Smallville (the story of a young Clark Kent), Erica Durance plays the role of Lois Lane. When Lois goes undercover as a dominatrix in order to get a story, she chooses my violet Swirly mask as part of her disguise.

I don't know if I should feel pleased or insulted! This scene unfolds on the episode titled "Supergirl", season 10 episode 3, and can be watched on hulu.com.

I don't know if I should feel pleased or insulted! This scene unfolds on the episode titled "Supergirl", season 10 episode 3, and can be watched on hulu.com.
Saturday, October 2, 2010
Black Rabbit Mask in Vogue Paris
My Rabbit mask in black leather is featured in the October 2010 issue of Vogue Paris magazine in an article entitled Bal Masqué.

Photo by Mert Alas & Marcus Piggott. Modeled by Mariacarla Boscono.
Wednesday, September 22, 2010
The Power of a Photograph to Sell
I have recently begun incorporating professionally shot photos of our masks into our Etsy listings, and in doing so have discovered just what a powerful tool a good photograph can be.
 This filigree Hearts mask in red was first offered a year and a half ago. I thought it was a good design, but it barely sold.
 A couple of weeks ago WinterWolf Studios took this photo of the Hearts mask, and suddenly sales of it are going through the roof! Same mask, different photo.
 In a similar situation, my photo of the Raven mask on a mannequin drew little attention.

 This filigree Hearts mask in red was first offered a year and a half ago. I thought it was a good design, but it barely sold.
 A couple of weeks ago WinterWolf Studios took this photo of the Hearts mask, and suddenly sales of it are going through the roof! Same mask, different photo.
 In a similar situation, my photo of the Raven mask on a mannequin drew little attention.
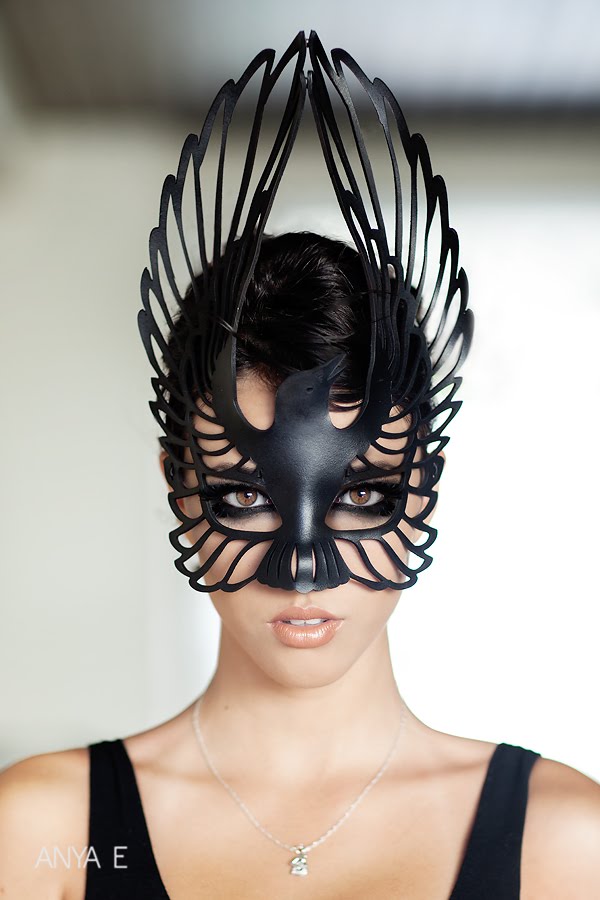
However this photo by Anya E Photography has got buyers clamoring for it. Same mask, better looking model!
PS. We are well into our Halloween season for masks, and are super busy, so don't expect too many posts until November.
Tuesday, September 14, 2010
Respirator #4
As I recall the first steampunk prop I ever made was the bad air transmutator respirator, which I still sell for $225 on Etsy. Ever since then, I've been wanting to design another respirator that I could sell for less. I make both respirators and gas masks, and the distinguishing feature in the nomenclature that I use is that respirators cover just the mouth and nose, whereas gas masks also cover the eyes.

I made a series of sketches to work out the design. I wanted to use mostly rivets in the construction, which is less labor-intensive than either machine- or handsewing.
 Initially I wasn't going to provide any resin canisters as another cost savings measure.
 Ultimately I decided to add two smaller identical canisters, as functionally it made little sense to have none.
 Once I was happy with the pattern I tested it in green paper, and when that looked like it was working I cut it out of leather and riveted it all together. I need to add straps and make a few alterations, but I think it's a good beginning.

I made a series of sketches to work out the design. I wanted to use mostly rivets in the construction, which is less labor-intensive than either machine- or handsewing.
 Initially I wasn't going to provide any resin canisters as another cost savings measure.
 Ultimately I decided to add two smaller identical canisters, as functionally it made little sense to have none.
 Once I was happy with the pattern I tested it in green paper, and when that looked like it was working I cut it out of leather and riveted it all together. I need to add straps and make a few alterations, but I think it's a good beginning.
Wednesday, September 8, 2010
Olifant: The Completed Gas Mask
Here are photos of the completed gas mask Olifant, son of Pachydermos.


Made of veg tan leather that's been antiqued black. Hand sewn with waxed thread. Lenses are tinted acrylic. Lens frames and tusk canisters made of cold cast aluminum, steel wire and bolts. Detachable ears are copper and leather. Gauge is a sphygmomanometer. Hose is black neoprene.


Made of veg tan leather that's been antiqued black. Hand sewn with waxed thread. Lenses are tinted acrylic. Lens frames and tusk canisters made of cold cast aluminum, steel wire and bolts. Detachable ears are copper and leather. Gauge is a sphygmomanometer. Hose is black neoprene.
Tuesday, September 7, 2010
WinterWolf Studios Meets the Eyecage Mask...
...and this is the result!


Visit WinterWolf's website to see more of their gorgeous work. The Eyecage mask is for sale at my Etsy store.


Visit WinterWolf's website to see more of their gorgeous work. The Eyecage mask is for sale at my Etsy store.
Monday, September 6, 2010
Olifant: Neoprene Trunk Hose
The second batch of black neoprene arrived safely, and so I proceeded to build the plaster mold.

First I softened plasticine in the microwave, then built it up around my model. I leveled it out right at midline, and I poured the first half of the mold in plaster.

After curing I removed the plasticine and poured the second half. After letting the mold halves dry for a couple of days I held them together with large rubber bands, and filled the cavity with the liquid neoprene. The plaster absorbed moisture from the rubber and a thin wall of solid material built up.

I emptied out the liquid neoprene and let the casting dry overnight before removing it from the mold. Here I am preparing for the final assembly, with the neoprene hose connecting the leather mask and the pressure gauge.

First I softened plasticine in the microwave, then built it up around my model. I leveled it out right at midline, and I poured the first half of the mold in plaster.

After curing I removed the plasticine and poured the second half. After letting the mold halves dry for a couple of days I held them together with large rubber bands, and filled the cavity with the liquid neoprene. The plaster absorbed moisture from the rubber and a thin wall of solid material built up.

I emptied out the liquid neoprene and let the casting dry overnight before removing it from the mold. Here I am preparing for the final assembly, with the neoprene hose connecting the leather mask and the pressure gauge.
Sunday, September 5, 2010
Zipper Cap >>> High Priest Helmet
I showed the zipper cap to my assistant and she immediately said it looked like a bathing cap from the 1950's. I about died, because I knew she was spot on, and that wasn't the look I was after.

After a bit of thought I decided that if I added a military type neck guard it just might rescue the project from ignominy.

It was important that I kept with the non fastener method of assembly, and so I pondered how I could make the neck guard flaps interlock with the cap I already had. By repeating the lower edge and constructing mountain tabs to interlock I arrived at the pattern shown above.

I dyed the nine neck guard pieces in matching colors and assembled them in groups of three.

And here is the result. After assembly the entire helmet was antiqued black to give it an aged look.

I'm pretty happy with how it turned out, and this model really gives it an other culture look.

After a bit of thought I decided that if I added a military type neck guard it just might rescue the project from ignominy.

It was important that I kept with the non fastener method of assembly, and so I pondered how I could make the neck guard flaps interlock with the cap I already had. By repeating the lower edge and constructing mountain tabs to interlock I arrived at the pattern shown above.

I dyed the nine neck guard pieces in matching colors and assembled them in groups of three.

And here is the result. After assembly the entire helmet was antiqued black to give it an aged look.

I'm pretty happy with how it turned out, and this model really gives it an other culture look.
Saturday, September 4, 2010
Zanni Leather Mask
Here is something a little different for me. A Commedia dell'arte style mask of the long-nosed character Zanni.

Making this mask entails a lot more hand shaping than I normally do.

Making this mask entails a lot more hand shaping than I normally do.

Saturday, August 28, 2010
Zipper Cap Construction
I really appreciate everyone's comments on this mystery project. Now it's time to reveal what I'm making. It's a cap, and totally a conceptual piece. I've been wanting to make a leather cap that was different and unusual, and I realized I could construct one that had no fasteners, and that struck me as a worthy project. Back in January 2009 when I first began my blog I built an experimental leather zipper, shown below.

It consists of two pieces of leather cut with interlocking teeth, which like a zipper will hold the two pieces together with sufficient force to allow it to function as a single piece. The tentacle endings are strictly ornamental.

I had never done anything with this "lipper" until now, when I realized it would work well with a six-panel cap. Shown below is a cap of a similar design that I made several years ago, and it consists of six identical symmetrical panels, each shaped like the bottom of an electric clothes iron (thanks to Craig for that insight).

I started with the six panel pattern, then added the interlocking teeth. I liked the tentacular extensions I had made on the experimental piece (reminiscent of Cthulhu) and so opted to keep them. The tight spiral is intended to provide the longest strip of leather in the smallest amount of space (leather is expensive and I don't want to waste it).
 I dyed the panels different colors on the fronts and backs because as the spirals are extended and twisted into tentacles both colors are seen together. Likewise I added the "mountain" cuts so that the leather can be bent down revealing the contrasting inner color as well as providing ventilation. Above I have begun to "zip together" two of the panels.
 Here you can see the two panels completely zipped together.
 And finally, all six panels are shown zipped together.

It consists of two pieces of leather cut with interlocking teeth, which like a zipper will hold the two pieces together with sufficient force to allow it to function as a single piece. The tentacle endings are strictly ornamental.

I had never done anything with this "lipper" until now, when I realized it would work well with a six-panel cap. Shown below is a cap of a similar design that I made several years ago, and it consists of six identical symmetrical panels, each shaped like the bottom of an electric clothes iron (thanks to Craig for that insight).

I started with the six panel pattern, then added the interlocking teeth. I liked the tentacular extensions I had made on the experimental piece (reminiscent of Cthulhu) and so opted to keep them. The tight spiral is intended to provide the longest strip of leather in the smallest amount of space (leather is expensive and I don't want to waste it).
 I dyed the panels different colors on the fronts and backs because as the spirals are extended and twisted into tentacles both colors are seen together. Likewise I added the "mountain" cuts so that the leather can be bent down revealing the contrasting inner color as well as providing ventilation. Above I have begun to "zip together" two of the panels.
 Here you can see the two panels completely zipped together.
 And finally, all six panels are shown zipped together.
Wednesday, August 25, 2010
Zipper Cap Dyed
I cut out six identical pieces in leather, and have dyed them.

On the grain side I dyed it red all over, then faded in black on the tips

On the flesh side I dyed half of them violet, and the other half teal.

Here are all the colors together for comparison. Can anyone tell what single object I'm going to make from these?

On the grain side I dyed it red all over, then faded in black on the tips

On the flesh side I dyed half of them violet, and the other half teal.

Here are all the colors together for comparison. Can anyone tell what single object I'm going to make from these?
Tuesday, August 24, 2010
New Project: Zipper Cap
Here is the start of a new project, and I need help with the backstory. What culture or religion or art style does this appear to come from? Any or all thoughts and comments are appreciated.


Tuesday, August 17, 2010
Modifying a Straw Hat
I wear a wide-brimmed hat on weekends when I go yardsaling to protect my fair skin from the sun. It's been this floppy fabric thing that has no shape to speak of, so I decided to buy myself a straw hat to replace it.

I went to K-Mart and found this basic straw hat for $7.99. I removed the hatband and the elastic sweatband (one size fits all!)

After soaking it in warm water I shaped it using a piece of stretch fabric (to hold up the brim on the sides) and metal clips (to weigh down the brim in the front and back).
 I placed the stretch sweatband around the outside of the crown to keep it from stretching out too large. Plus I reshaped the top of the crown.
 After it dried I stained it with dyes and antiquing to give it a bit of character. Now I just need to come up with a hat band to finish the look.

I went to K-Mart and found this basic straw hat for $7.99. I removed the hatband and the elastic sweatband (one size fits all!)

After soaking it in warm water I shaped it using a piece of stretch fabric (to hold up the brim on the sides) and metal clips (to weigh down the brim in the front and back).
 I placed the stretch sweatband around the outside of the crown to keep it from stretching out too large. Plus I reshaped the top of the crown.
 After it dried I stained it with dyes and antiquing to give it a bit of character. Now I just need to come up with a hat band to finish the look.
Subscribe to:
Posts (Atom)