Showing posts with label steampunk. Show all posts

Wednesday, February 8, 2012

Olifant Outlaw

As part of my learning with Photoshop I decided to create a remake of a picture I took of my wife Jill several years ago wearing the Pachydermos mask, as seen below.

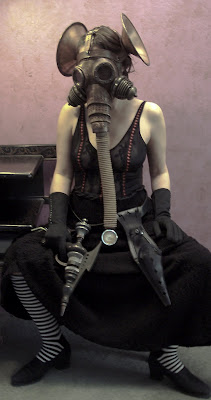
I figured with my new camera and lighting equipment that I could improve on the original, which was not well lit and a bit out of focus.


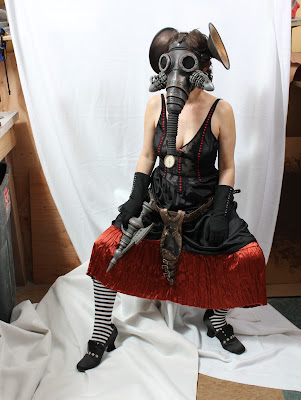
First I posed her on a white background for easy extraction in a pose similar to the first one, and with most of the same costume.
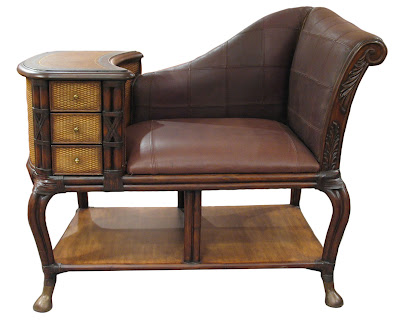

I then went to stock.xchng to look for free pictures that they offer for the furniture and interior. Here is a great old telephone table that looks like it could be Victorian, which is the look I was after.

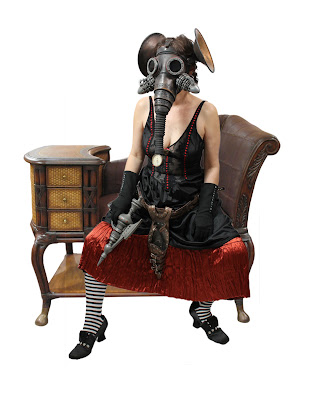
After extracting the figure in Photoshop (removing the background) I combined her with the seat, resizing them as necessary to make it look like they went together.


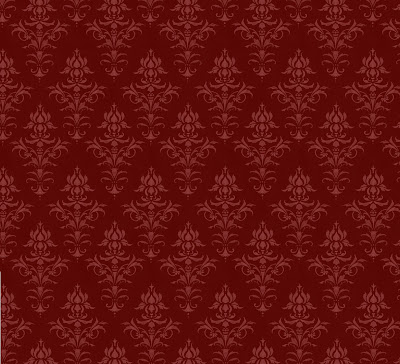
Next I looked for wallpaper and discovered this pattern on DeviantArt, which was offered for free usage.


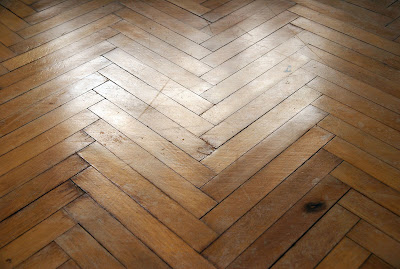
And back on stock.xchng I found a nice old floor.


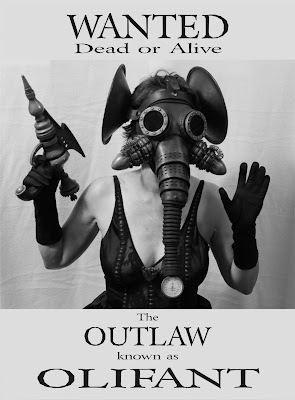
I decided that a wanted poster for our heroine would be a nice touch, and created this one in Corel Draw. I then combined all the images, and photographed and added in some miscellany to populate the floor for my final image, seen below.


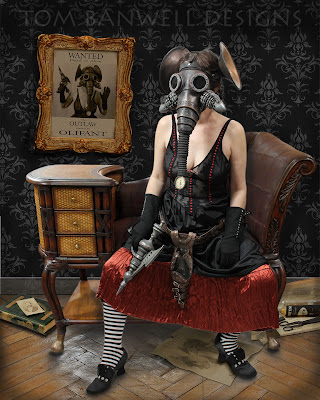
My original plan was to extract the figure and find a single photo to place her in. I ended up with ten separate images which make up the final picture.

Friday, February 25, 2011

Respirator Workshop at Nova Albion

In less than a month Nova Albion, this year's northern California steampunk convention will be taking place in Santa Clara, March 25 - 27.

I will be teaching a hands-on workshop in which participants will begin construction of a leather respirator, very much like the Excursionist pictured. The only difference is that most of the rivets will be replaced with hand stitching so that everyone can be working on it at the same time.

Cost of the workshop is $20 to cover materials, and everything is included except for stain (for the leather and canisters) and contact cement. The Excursionist sells at my Etsy shop for $125. Such a deal! The schedule for workshops has not yet been announced.


Sunday, October 18, 2009

Oxford Steampunk Exhibit: My Masks

I was unable to attend the opening of the University of Oxford's Steampunk Exhibition due to a very busy work schedule, but I did find these pictures of my helmets online, taken by Chaffro.


For photos of other works of art at the exhibit check out the Flickr group Oxford Steampunk Art Exhibit.

Friday, September 25, 2009

MHS Programme of Events

I am honored to have the Museum of the History of Science, located at the University of Oxford, use a photo of my Underground Explorer helmet and gas mask to advertise their upcoming steampunk exhibiton.


Monday, July 13, 2009

Steampunk Exhibition at Oxford

I am very honored to have been asked to participate in the first ever steampunk exhibition to be held at a museum. It will be at the University of Oxford in the UK and runs from 13 October 2009 to 21 February 2010.


On display will be my steampunk works Pachydermos, Underground Explorer, Defender and Gas Mask.

Monday, June 29, 2009

Defender: Mask is Dyed


Back to the Defender mask, I have now sewn on the trim for all four openings, and dyed it violet, prior to antiquing it black. One eyepiece is shown. I'm still figuring out what the respirators will look like.

Sunday, June 28, 2009

Defender: Helm with Plate

Today I attached the plate onto the front of the steampunk Defender helm. Not a lot left to do now. Mostly things that don't show.

Thursday, June 25, 2009

Defender: Attaching the Aether Collectors

The Defender steampunk helm is getting ever so much closer to completion. Today I added the ten luminiferous aether collection devices.


After riveting the devices to the neckguard trim I stitched and riveted the trim to the neckguard itself.


I then antiqued it to match the rest of the helmet. No more bright colors!


Here is a detail photo of the rear of the helm, showing the crest and the aether devices. Next I will finish and mount the front plate.

Wednesday, June 24, 2009

Defender: The Aether Collector

Here is the working part of the Defender helmet: The luminiferous aether collection device. The neckguard will have a bank of ten of these little beauties.


Luminiferous aether is the substance which fills the upper regions of space beyond the clouds. It is the medium which allows light to travel. The luminiferous aether collection device was designed to gather the energy from the aether and convert it for personal use.

Tuesday, June 23, 2009

Defender: Adding Piping

To finish off the two eye openings on the mask, as well as the respirator openings I am stitching on leather piping. The mask parts are 4-5 oz leather, while the piping is only 2-3 oz, so it will more easily fold.


The pattern for the piping is a rectangle. Here you can see the piping piece at the bottom, and on one of the eye openings the piping has been attached. In addition to looking better, it makes attaching the resin eyepieces easier.

Monday, June 22, 2009

Defender: Starting the Mask

With the helmet nearing completion, I have begun on the mask. These two parts—the helmet and mask—could be worn alone, but they are designed to be worn together.


This is a variation of the gas mask, with two respirators on the sides of the snout replacing the single central one, which gives it an eerie alien look.


Each of the two eyepieces will be different. One of them will resemble a camera lens, and the other a porthole.


Here is a photo of the mask after the major leather pieces have all been stitched together.

Thursday, June 18, 2009

Defender: Antiquing the Helm

I went ahead and riveted the crest to the helm, and then antiqued it all black. The purple and red now remain only as highlights, just the look I was after.


I've been building the luminiferous aether collection devices that fit into the neckguard trim, and I can't assemble that until they are all cast.


Meanwhile, I have started on the headlamp. Here is a photo of the lamp as I found it at a yard sale. I will break it apart, and then the lamp will attach to the front of the helm.

Monday, June 15, 2009

Defender: The Neckguard Trim

I will be adding a second layer of leather over the bottom edge of the neckguard, in order to reinforce it and make it lay smoother. If I make the trim the same size as the neckguard, and stitch them together, the resulting piece will want to lay flat, which I don't want. The neckguard should roughly form a half circle. In order to get it to readily make that shape I will make the trim piece longer than the base piece.

If you take two pieces of paper—one slightly shorter than the other—and fasten the ends together, it will bend into a curve. If you wrap tape around a tube, and keep adding it on over itself, the tape will build up in thickness, with the circumference of each turn being slightly larger than the previous one. Drafting a pattern for the neckguard uses the same principle.


I can make the patterns in paper, and bend and measure them to find the right size differential, but that won't be accurate for cutting it in leather because the leather is thicker than paper, and thus needs a larger differential. Add to that the fact that vegetable tanned leather—which I cut and stitch while damp—will shrink while drying, and I can only guess at how long the trim should be.


Here is the neckguard trim piece after cutting and dying.


And here it is tacked into position. The oblong openings will hold luminiferous aether collection devices.

Saturday, June 13, 2009

Defender: Coloring the Helm

I reworked the helm pattern by enlarging it all over, plus eliminating the center crown strip. The fit on the form is good, although it could have been a scoutch smaller. I also went with a firmer leather. In general leather is described by what animal it comes from, its thickness, and its stiffness. The latter quality being mellow on one end of the spectrum and firm on the other.

My first undersized helm was made of a rather mellow leather, because in the 5-6 oz thickness I wanted to use, that was all I had. Once I realized I would have to remake the helm I ordered a side of cowhide specifying that it be firm. Consequently the new helm is not so floppy as the first one was.

I will be making the helm and accompanying mask predominantly black, but I want a few highlights of red and violet showing through. The first step is dying those colors, shown above.

Wednesday, June 10, 2009

Defender: Designing the Crest

I decided before I remade the crown and neck guard of the helm I would work out the crest, as it plays a prominent role in the helmet's appearance, and could affect how I should redesign the other parts.


This sketch shows my original concept. The helmet—once it was made in leather—really had a samurai feel to it, and no longer looked straight out of Star Wars. I feel that the crest simply adds to the Asian flair.


I used the green paper to work out the pattern of the interlocking leather pieces, then cut and riveted them in leather as seen here on the prototype helmet, in approximately the final position.

Monday, June 8, 2009

Defender: Sewing the Helm

I spent many hours both yesterday and today handstitching together the Defender helmet parts with waxed thread. Alas, it turned out to be too small for the plastic form. I cut and sew the leather wet, and when it dries it shrinks, so there is a certain amount of guesswork involved in making the patterns.


For this helmet, the form is important because the leather will be stretched around it to get its smooth shape. Unfortunately I have decided it will be better in the long run to start over again by enlarging the patterns. The other option would be to cut down the form, but that risks destroying it, and rendering all my efforts for naught.

Saturday, June 6, 2009

Defender: A New Steampunk Helmet

Time to start a new steampunk helmet/mask. This one has a working title of Defender. My last project—the underground explorer helmet—was met with much critical acclaim.


Since it started with pulling a pattern from a simple toy helmet, I have decided to use the same technique for the Defender's helmet. This time the form is a Darth Vader plastic helmet that I found at a yard sale.


Here I have covered half the helmet in two plus layers of masking tape, and marked with a felt pen where my seam lines will go.


These are the two patterns cut off of the helmet and laid down flat on cardboard. Next I will adjust these pieces so that they will work in leather, then cut the leather and handstitch all four pieces together.

Friday, June 5, 2009

Underground Explorer Raygun

To finish off the underground explorer's outfit for his formal photograph I put together a down and dirty "rock blaster" raygun.


You can cut through solid rock likes it's butter with this puppy!


Anybody recognize what I made this from?

Friday, May 22, 2009

Underground Explorer: Oxygen Canister

I have had a good response to my writing competition. Seems like there are a lot of writers happy for an excuse to create a short steampunk story.

The final piece of the undeground explorer helmet is the oxygen canister which connects to the leather snout. Pictured below is the antiqued canister with rubber tubing and the connection at the other end.


Still to construct is the leather strapping which will allow the canister to be worn on the back or over the shoulder. Brownie points to anyone who can identify the original item from which the canister was made.

I leave for Maker Faire in San Mateo, CA exactly one week from today, and the finished helmet will be the centerpiece of my display.

Friday, May 15, 2009

Steampunk Writing Competition

I am holding a competition to write the back story that will accompany my Underground Explorer helmet. I am looking for an original and creative tale of a steampunk genre that explains who the owner of the helmet is, and how the helmet came to be. Most if not all of the helmet’s features should be touched upon: The goggles, the respirator (snout), the comb with attached headlamp, and the attached breathing device.


The helmet as pictured is almost but not quite complete. The explorer will have an oxygen canister which connects to the respirator with a black corrugated rubber hose. The canister can be worn on the back or over the shoulder.


This story will be used to promote the sale of the helmet, and will be seen on Etsy, Flickr, and DeviantArt as well as being posted on my blog. The one element that must be adhered to is that the helmet is for underground exploration. It is made almost entirely of leather. The lamp is positionally adjustable. The goggles have dark lenses. The respirator has two side faux metal pieces in addition to the hose that connects to the oxygen canister. Both the goggles and the respirator are detachable.


The competition will run from now until May 31. I alone will be the judge and will determine the winner, who will be announced on June 1. The winner will receive a prize which consists of a $39 credit at my Etsy store, plus shipping. Most all of my cut out masks sell for $39, so think of it as your choice of a mask, although the winner can apply it anyway they want.

Please make your story between 300 and 500 words. You may submit more than one entry. Have fun and start writing! Get as crazy as you like. If you have any questions post them here on this blog. For your finished entry please email it to tom (at) tombanwell (dot) com.